Godai’s Jinbaori

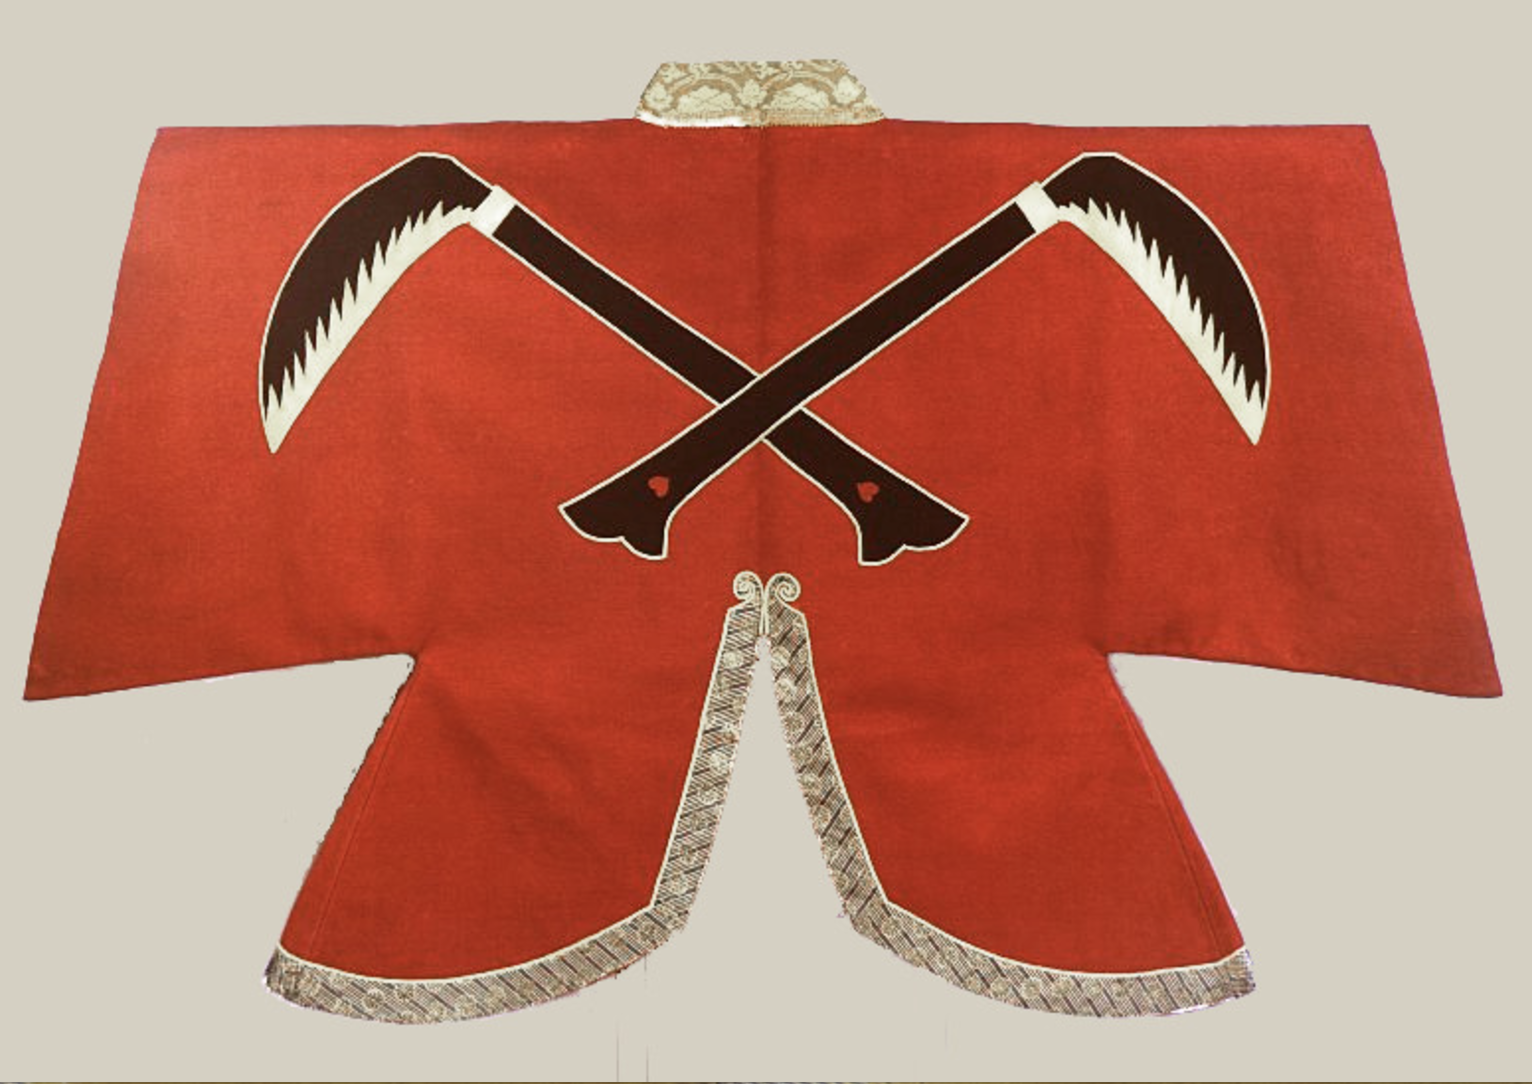
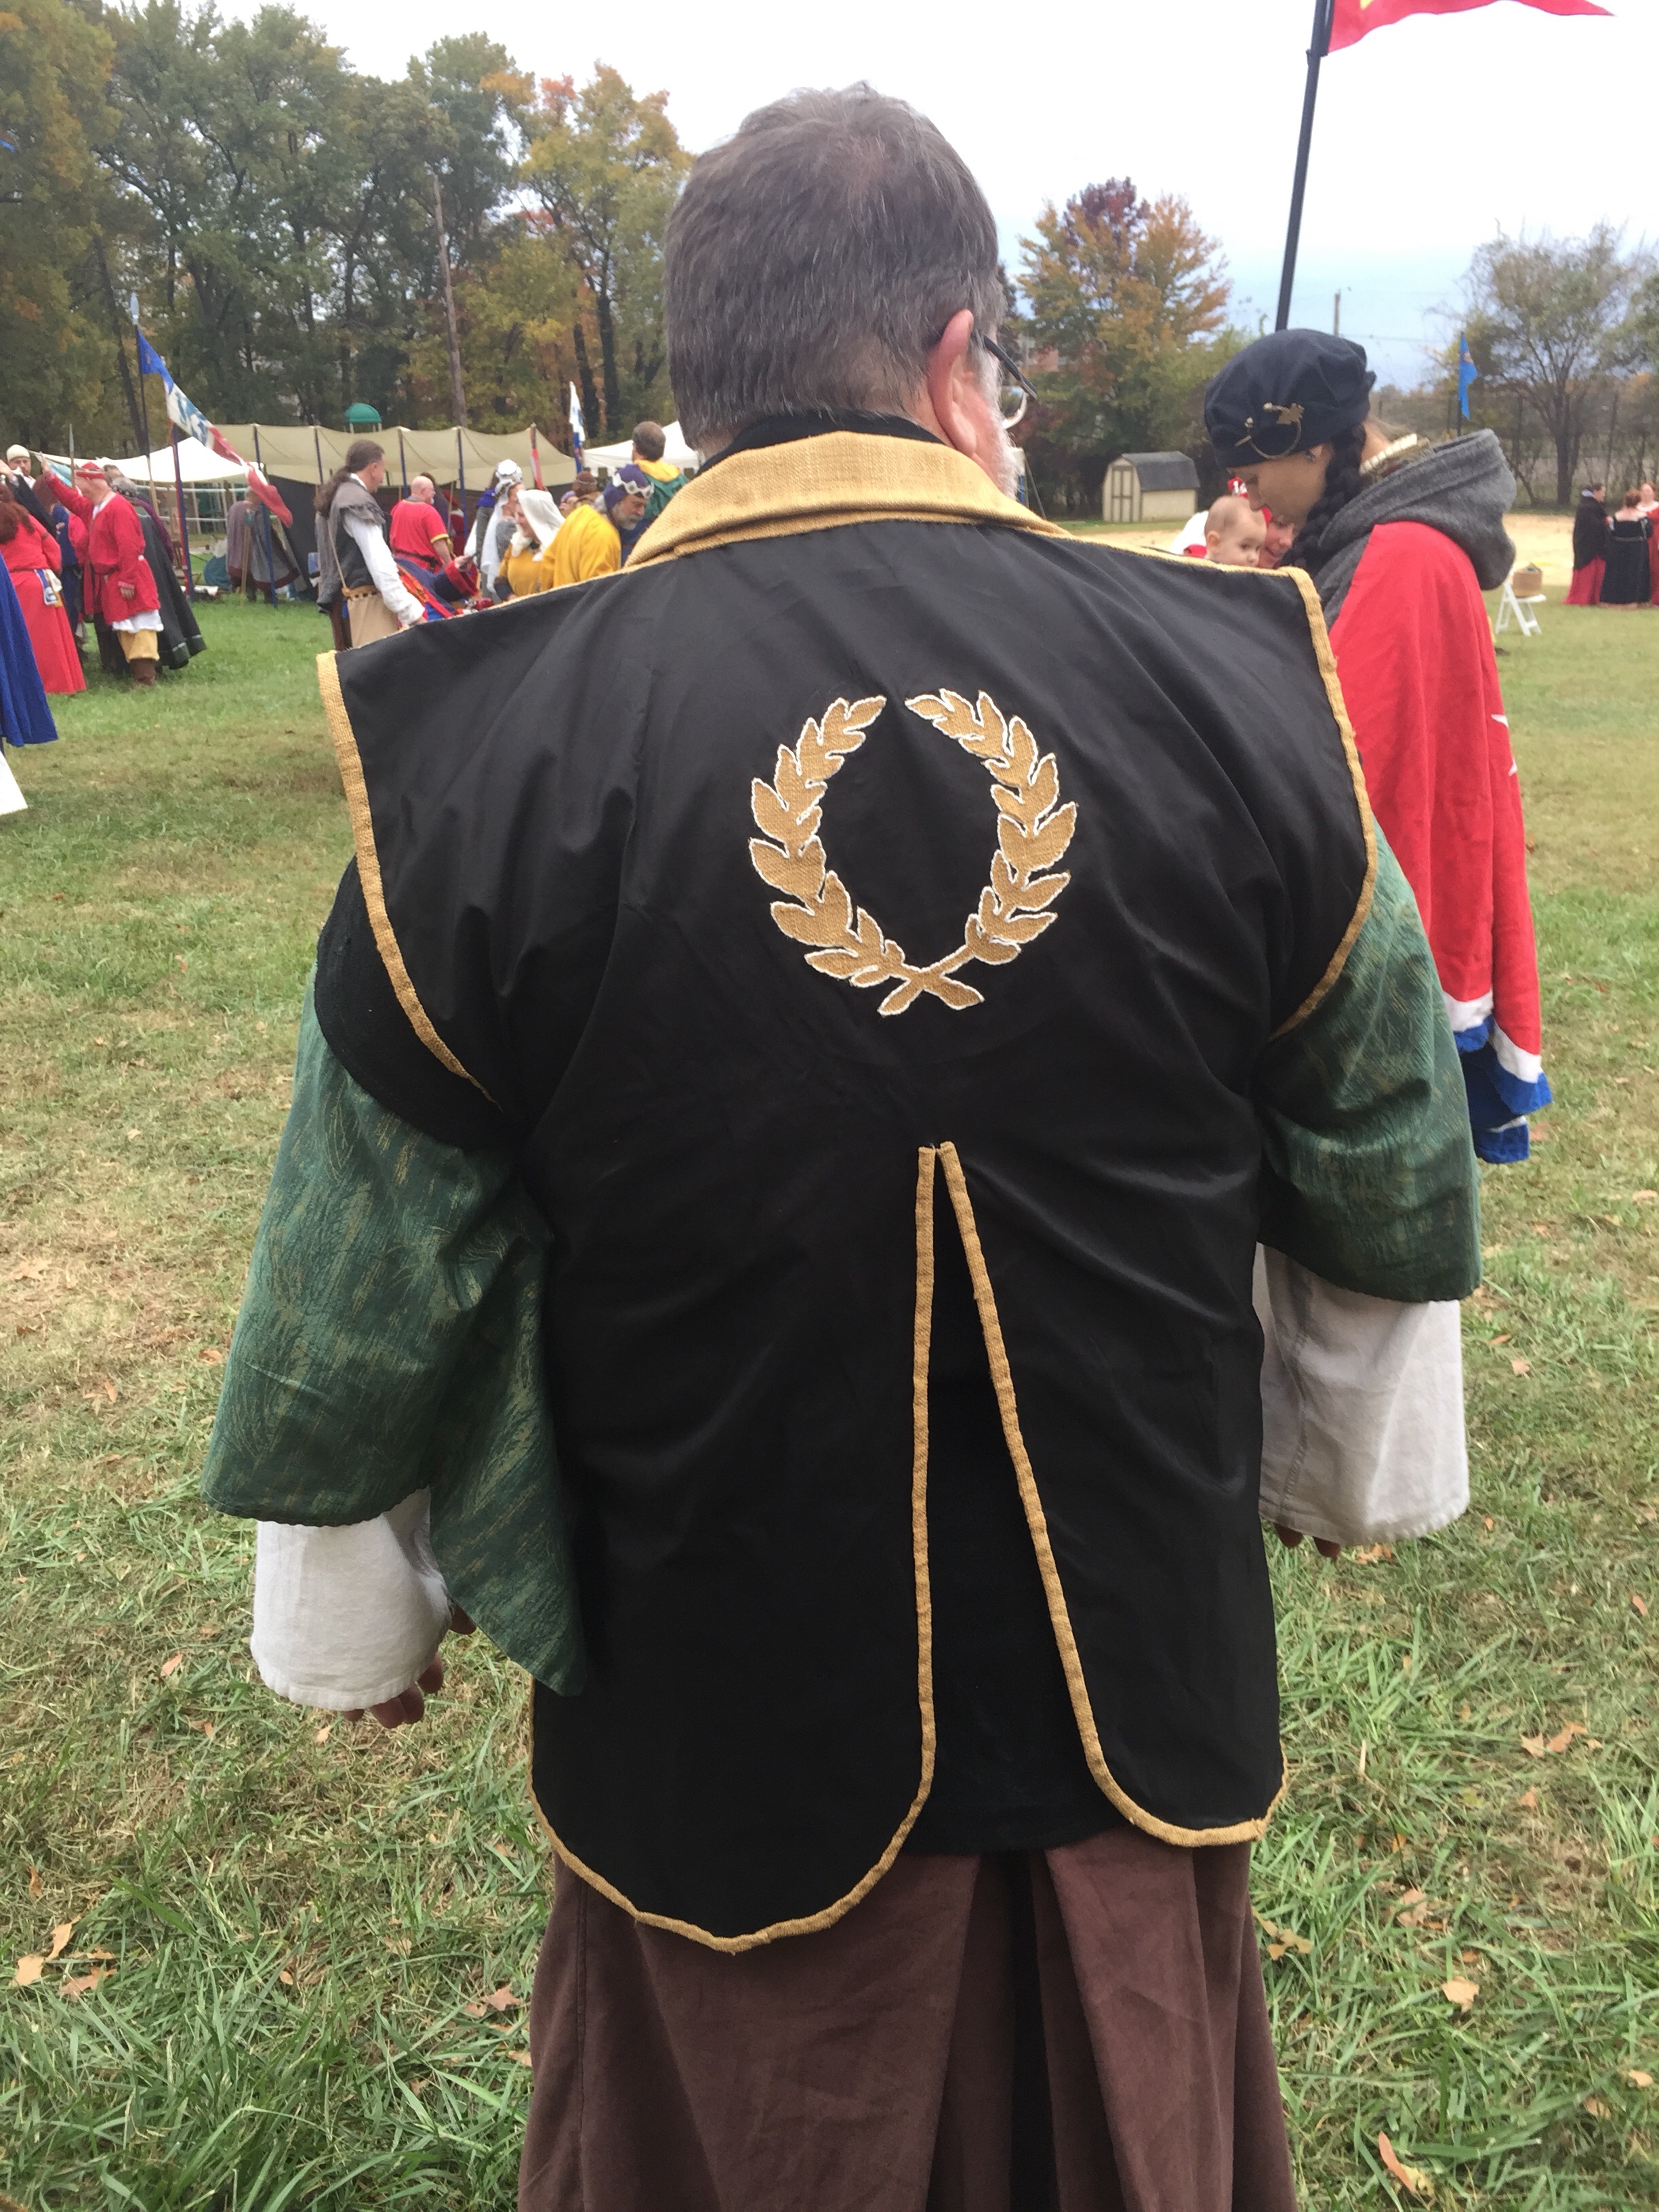
For his laureling, I made 五代勝長先生の陣羽織 (Master Godai Katsunaga’s jinbaori). The overall pattern and placement of the laurel wreathes mirror this late Muromachi era (1336–1573) 陣羽織, which has the 紋 (mon) centered large on the back and then smaller on each side of the chest.

Background

The 陣羽織 below is made using 切り嵌め (kirihame) piecing, where wool is cut and pieced, with nearly invisible stitching holding the pieces together. It’s only possible with felted or well-fulled wool, since that will resist fraying. Consequently, it reached Japan relatively late, with the European introduction of woolen goods to Japan.

Bonham’s website doesn’t have the picture online anymore, so here’s a screenshot of what it looked like.

Because silk or linen (ie. not wool) were specifically requested, piecing was not an option for me. 切り嵌め is an umbrella term that includes both piecing and appliqué (In Pursuit of Beauty: Americans and the Aesthetic Movement). This 陣羽織 worn by Kobayakawa Hideaki in the Momoyama era (1574–1600) shows both types of  切り嵌め. The white blades are pieced, while the black handles are appliquéd (Foley, Valerie. The Jinbaori: Oneupsmanship on the Battlefield).

back of red garment with crossed sickles appliquéd on
Kobayakawa Hideaki’s jinbaori, in the Tokyo National Museum

This one

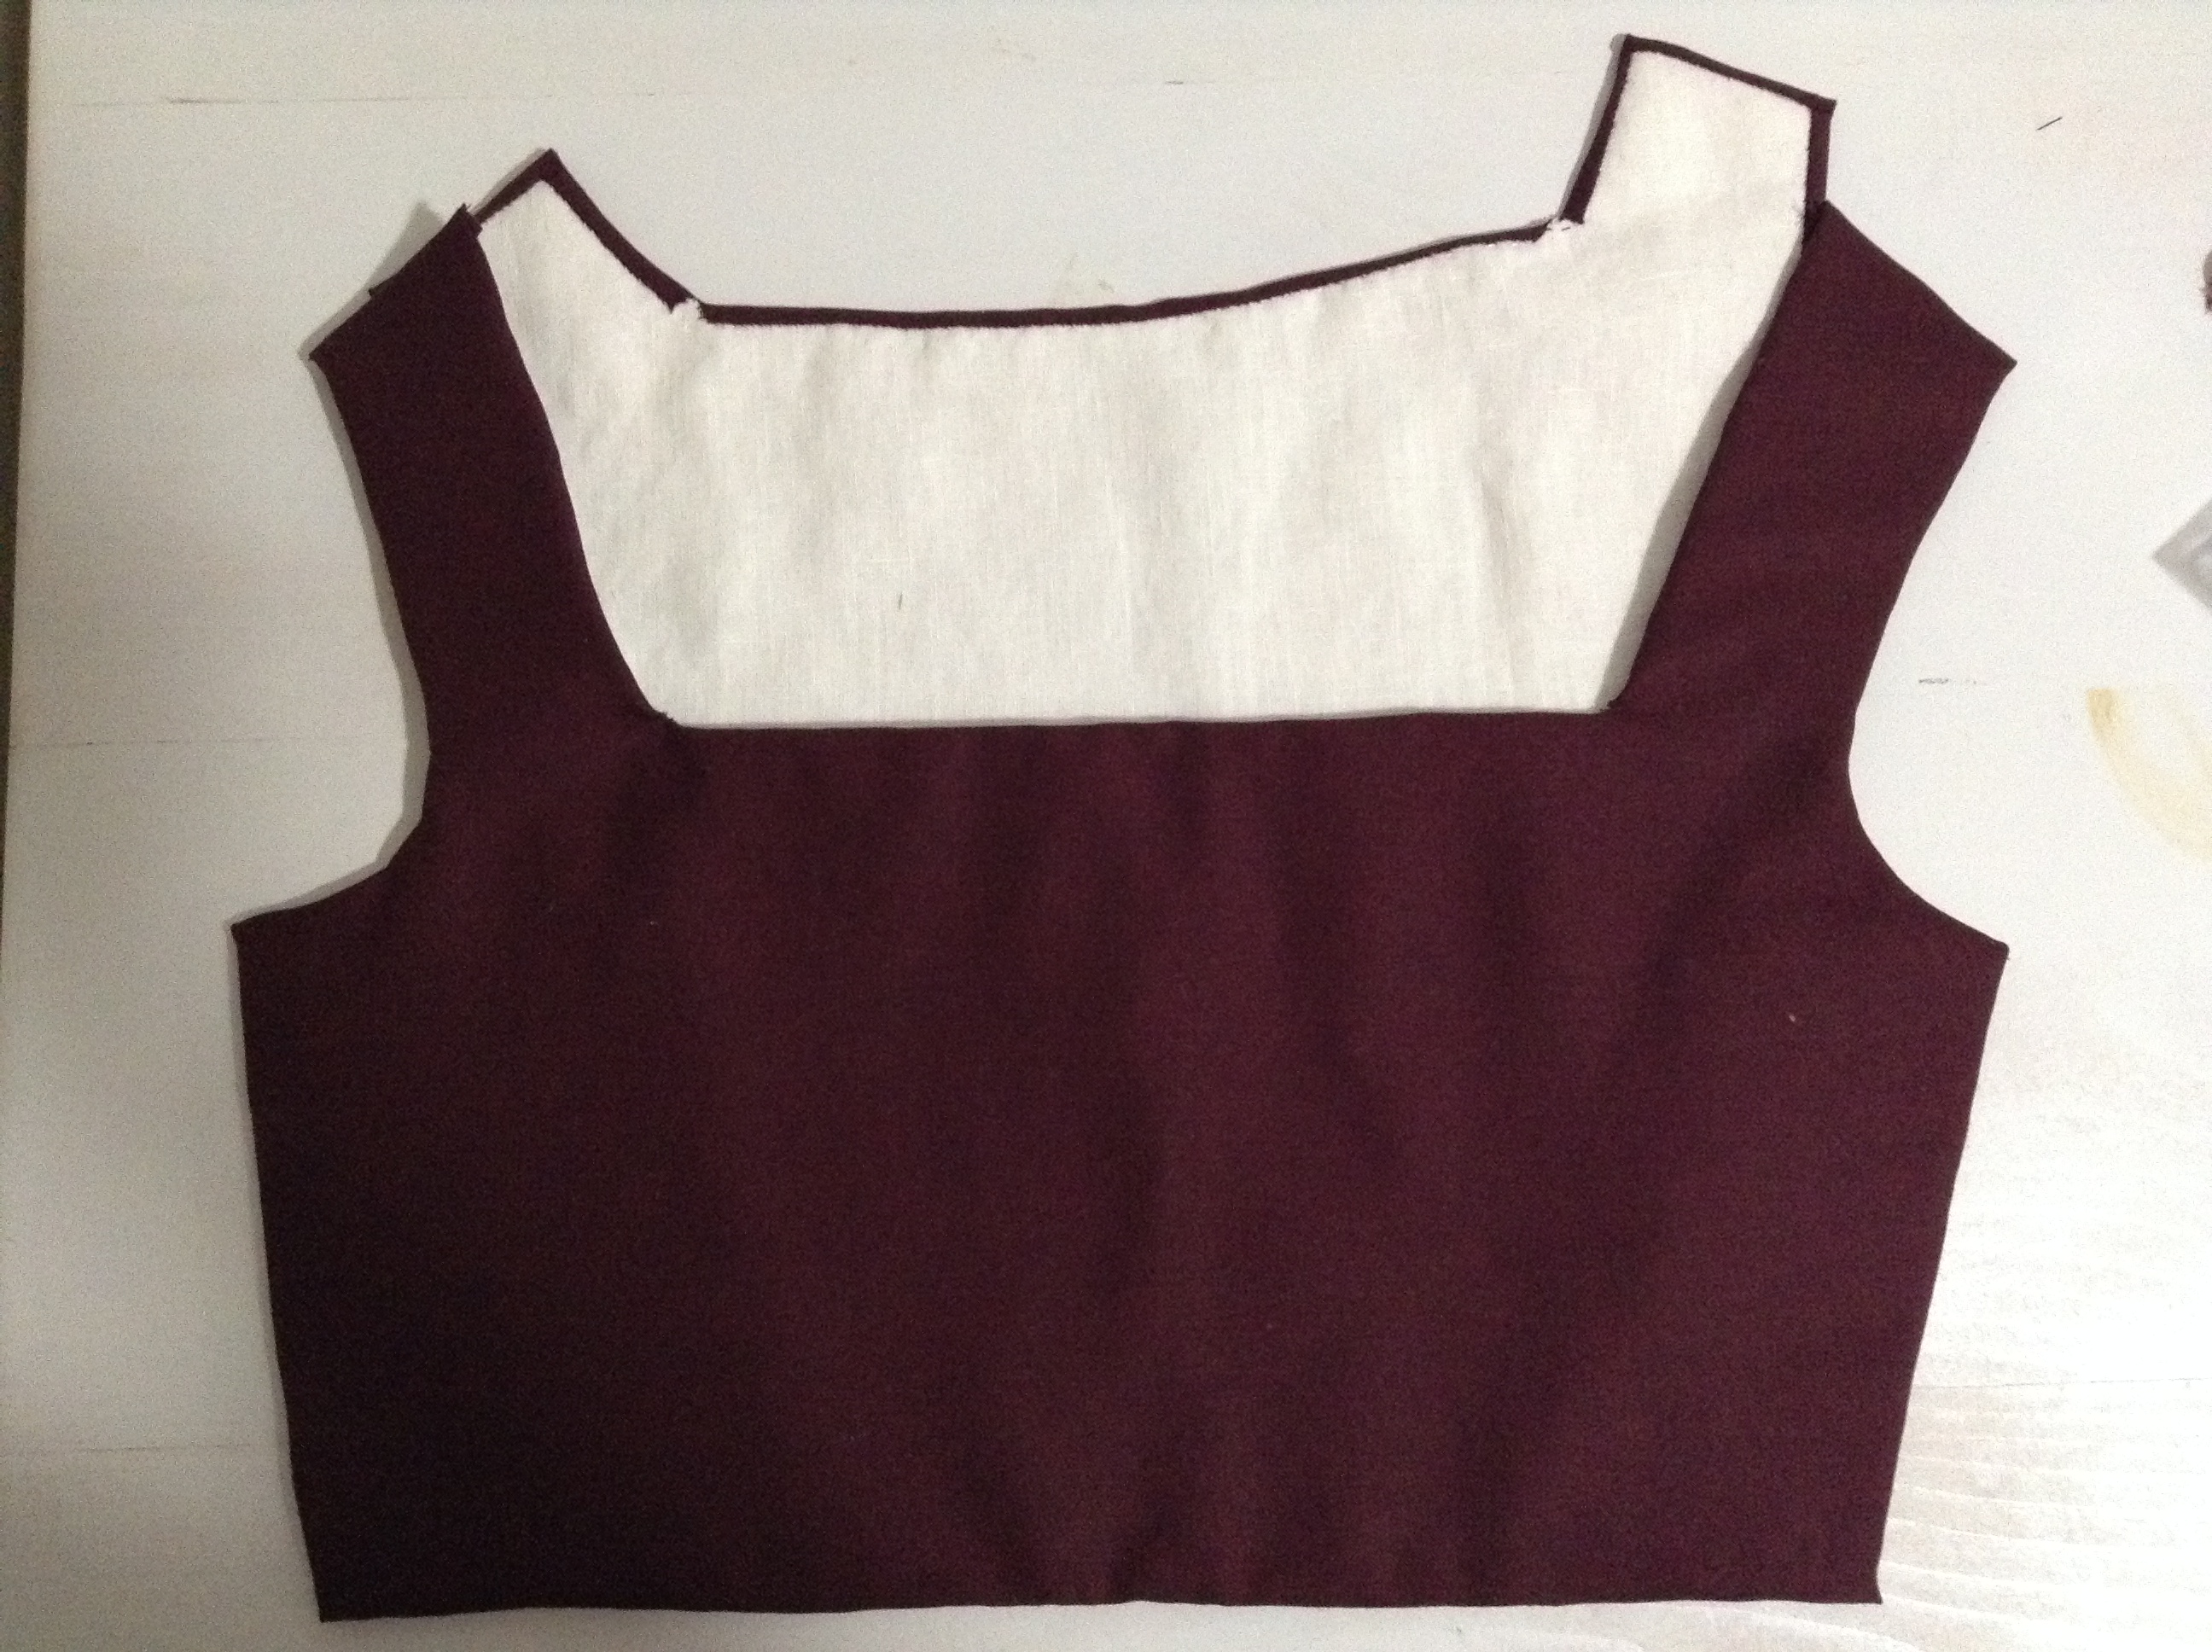
The 陣羽織 for 五代先生 (Master Godai) is made from black silk taffeta. A remnant length of coarse raw silk, dyed gold, was available from the same merchant, so I used that for the appliqué.

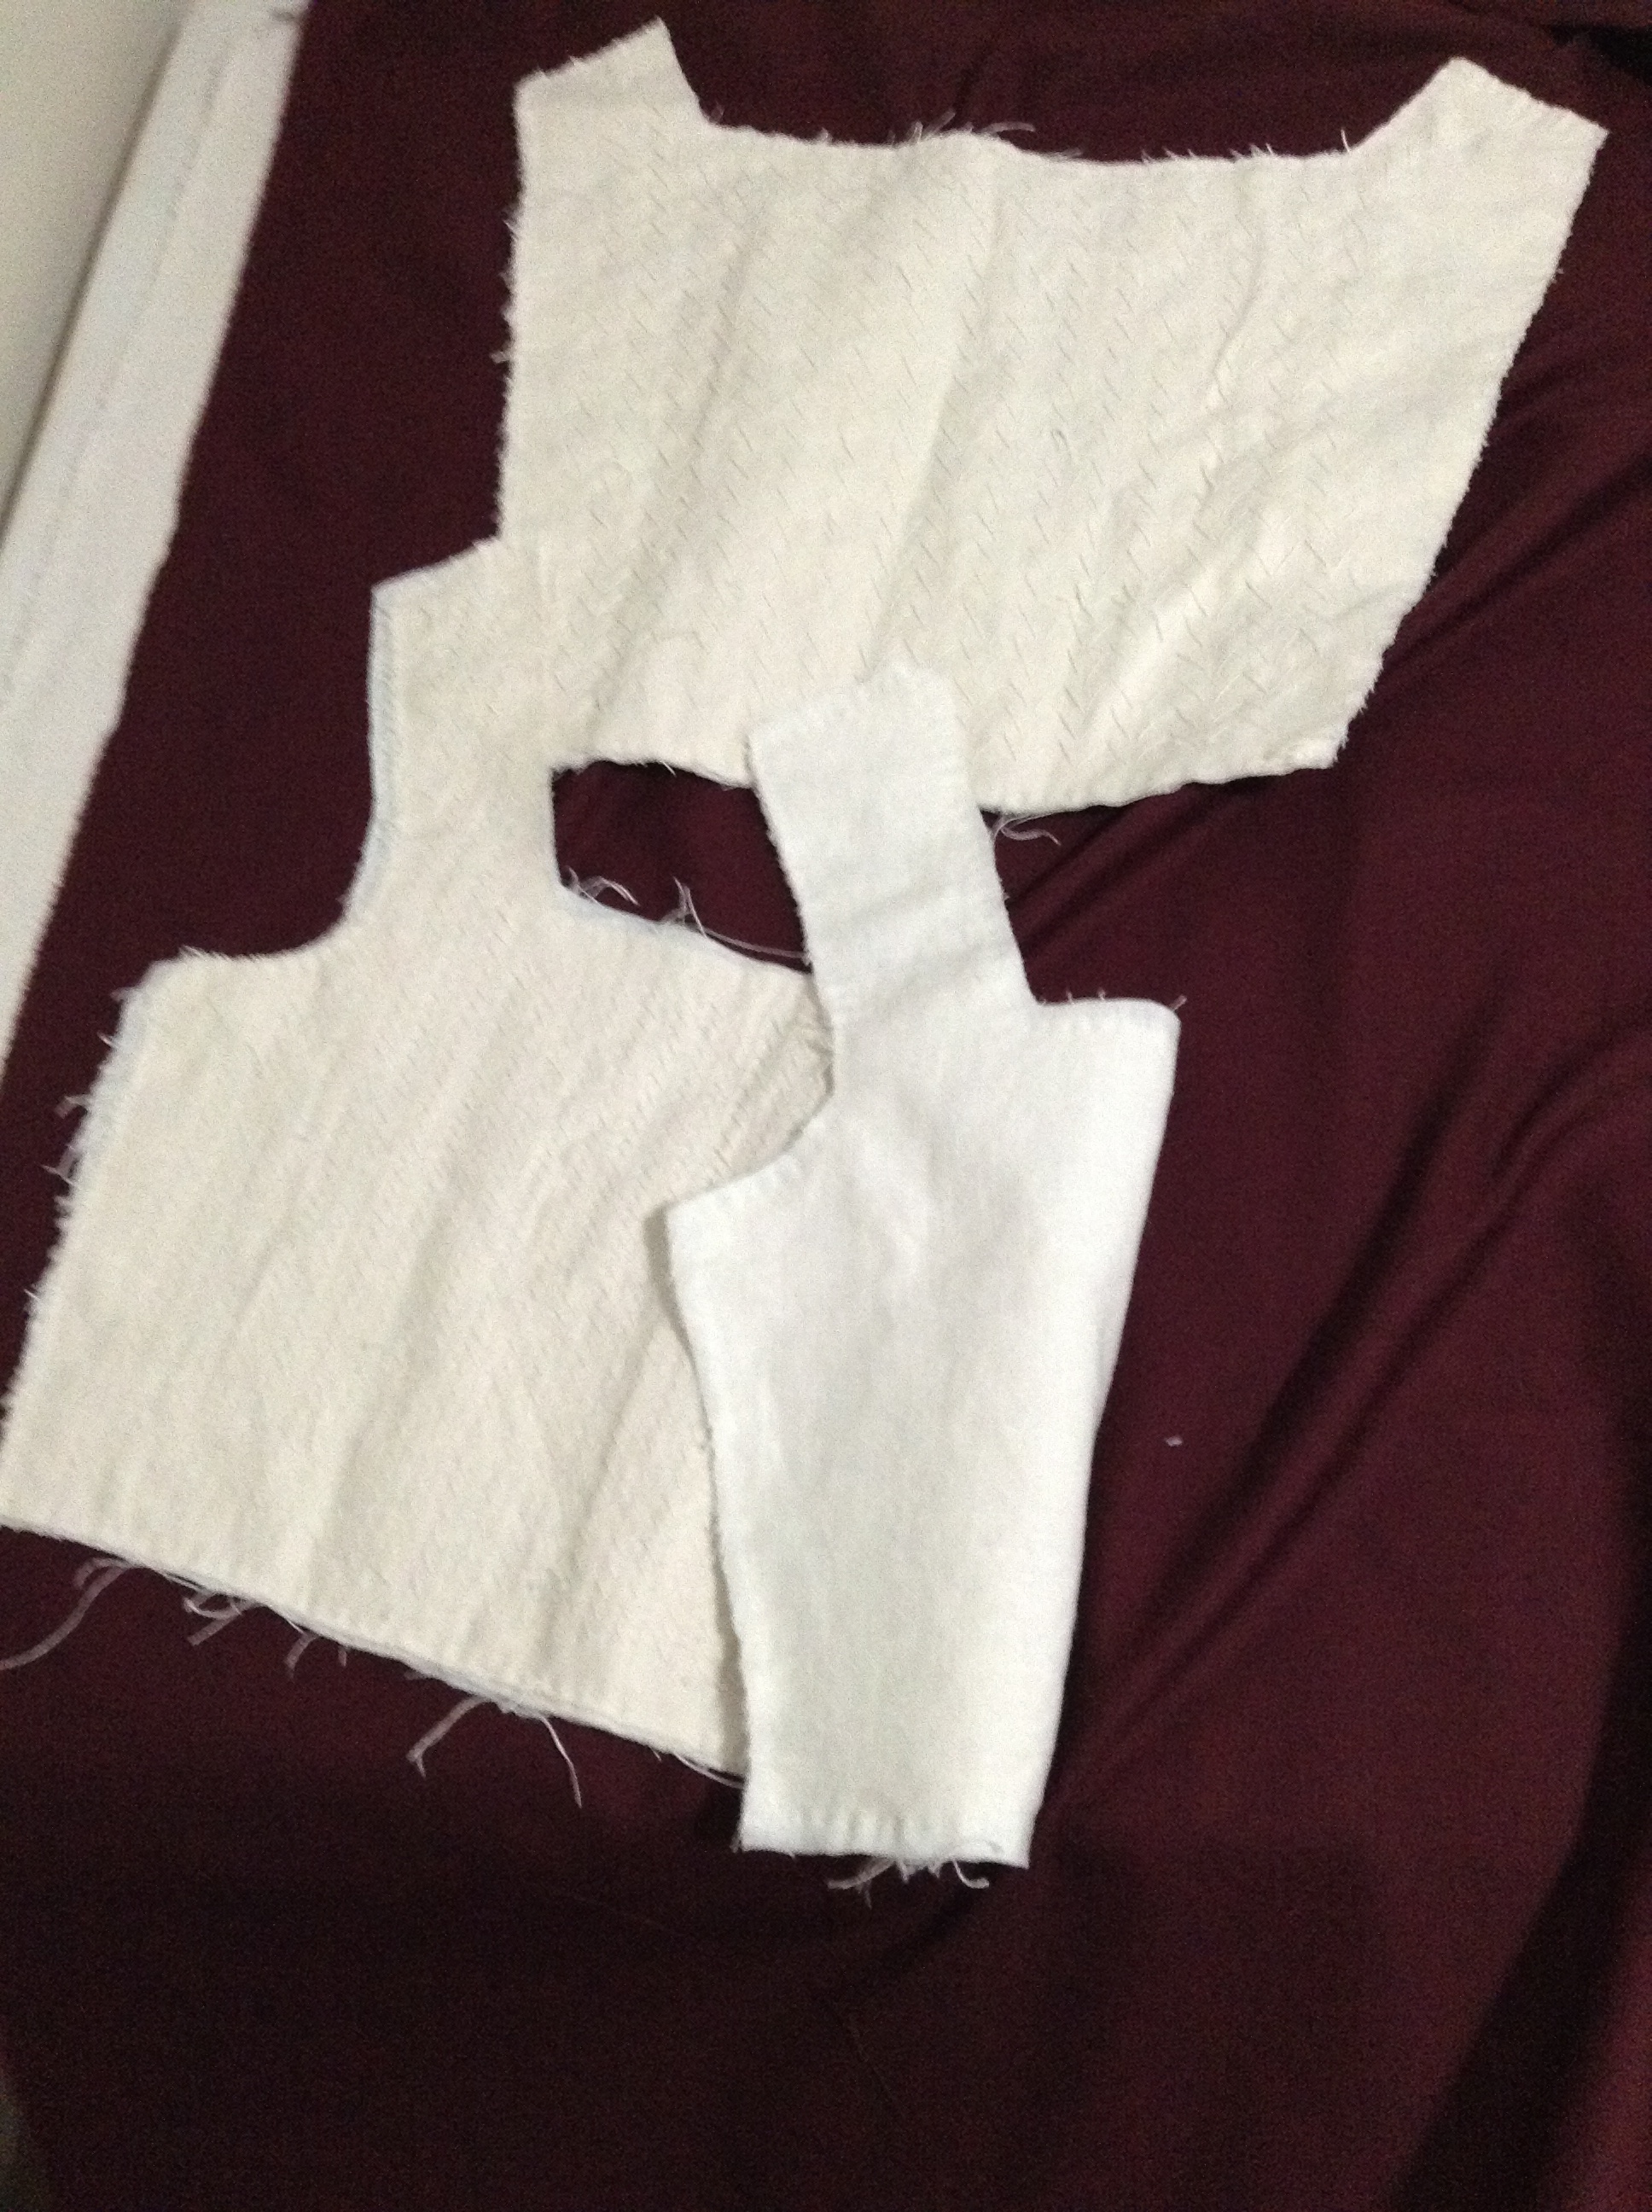
To start off, it’s a very basic rectangular construction like the black and white one above. The arm holes are very large, to allow room for the 着物 (kimono—fun fact: it literally means “wearing thing”) sleeves. 着物 are also just a bunch of rectangles. The edges are bound with the contrasting gold silk.

Sewing progress

Oh, and I misplaced the remaining yard of black silk. I’m not sure it made it home from Pennsic. I finished the back of the collar using several layers of a lighter weight black silk from my stash. I stitched it using 刺子 (sashiko—many rows of running stitches), a technique used for repair, ornamentation, and for stiffening. 刺子 has ample use in this period on other garments. Because I could not find any examples of 刺子 used as ornamentation on a 陣羽織, I used black thread on black fabric.

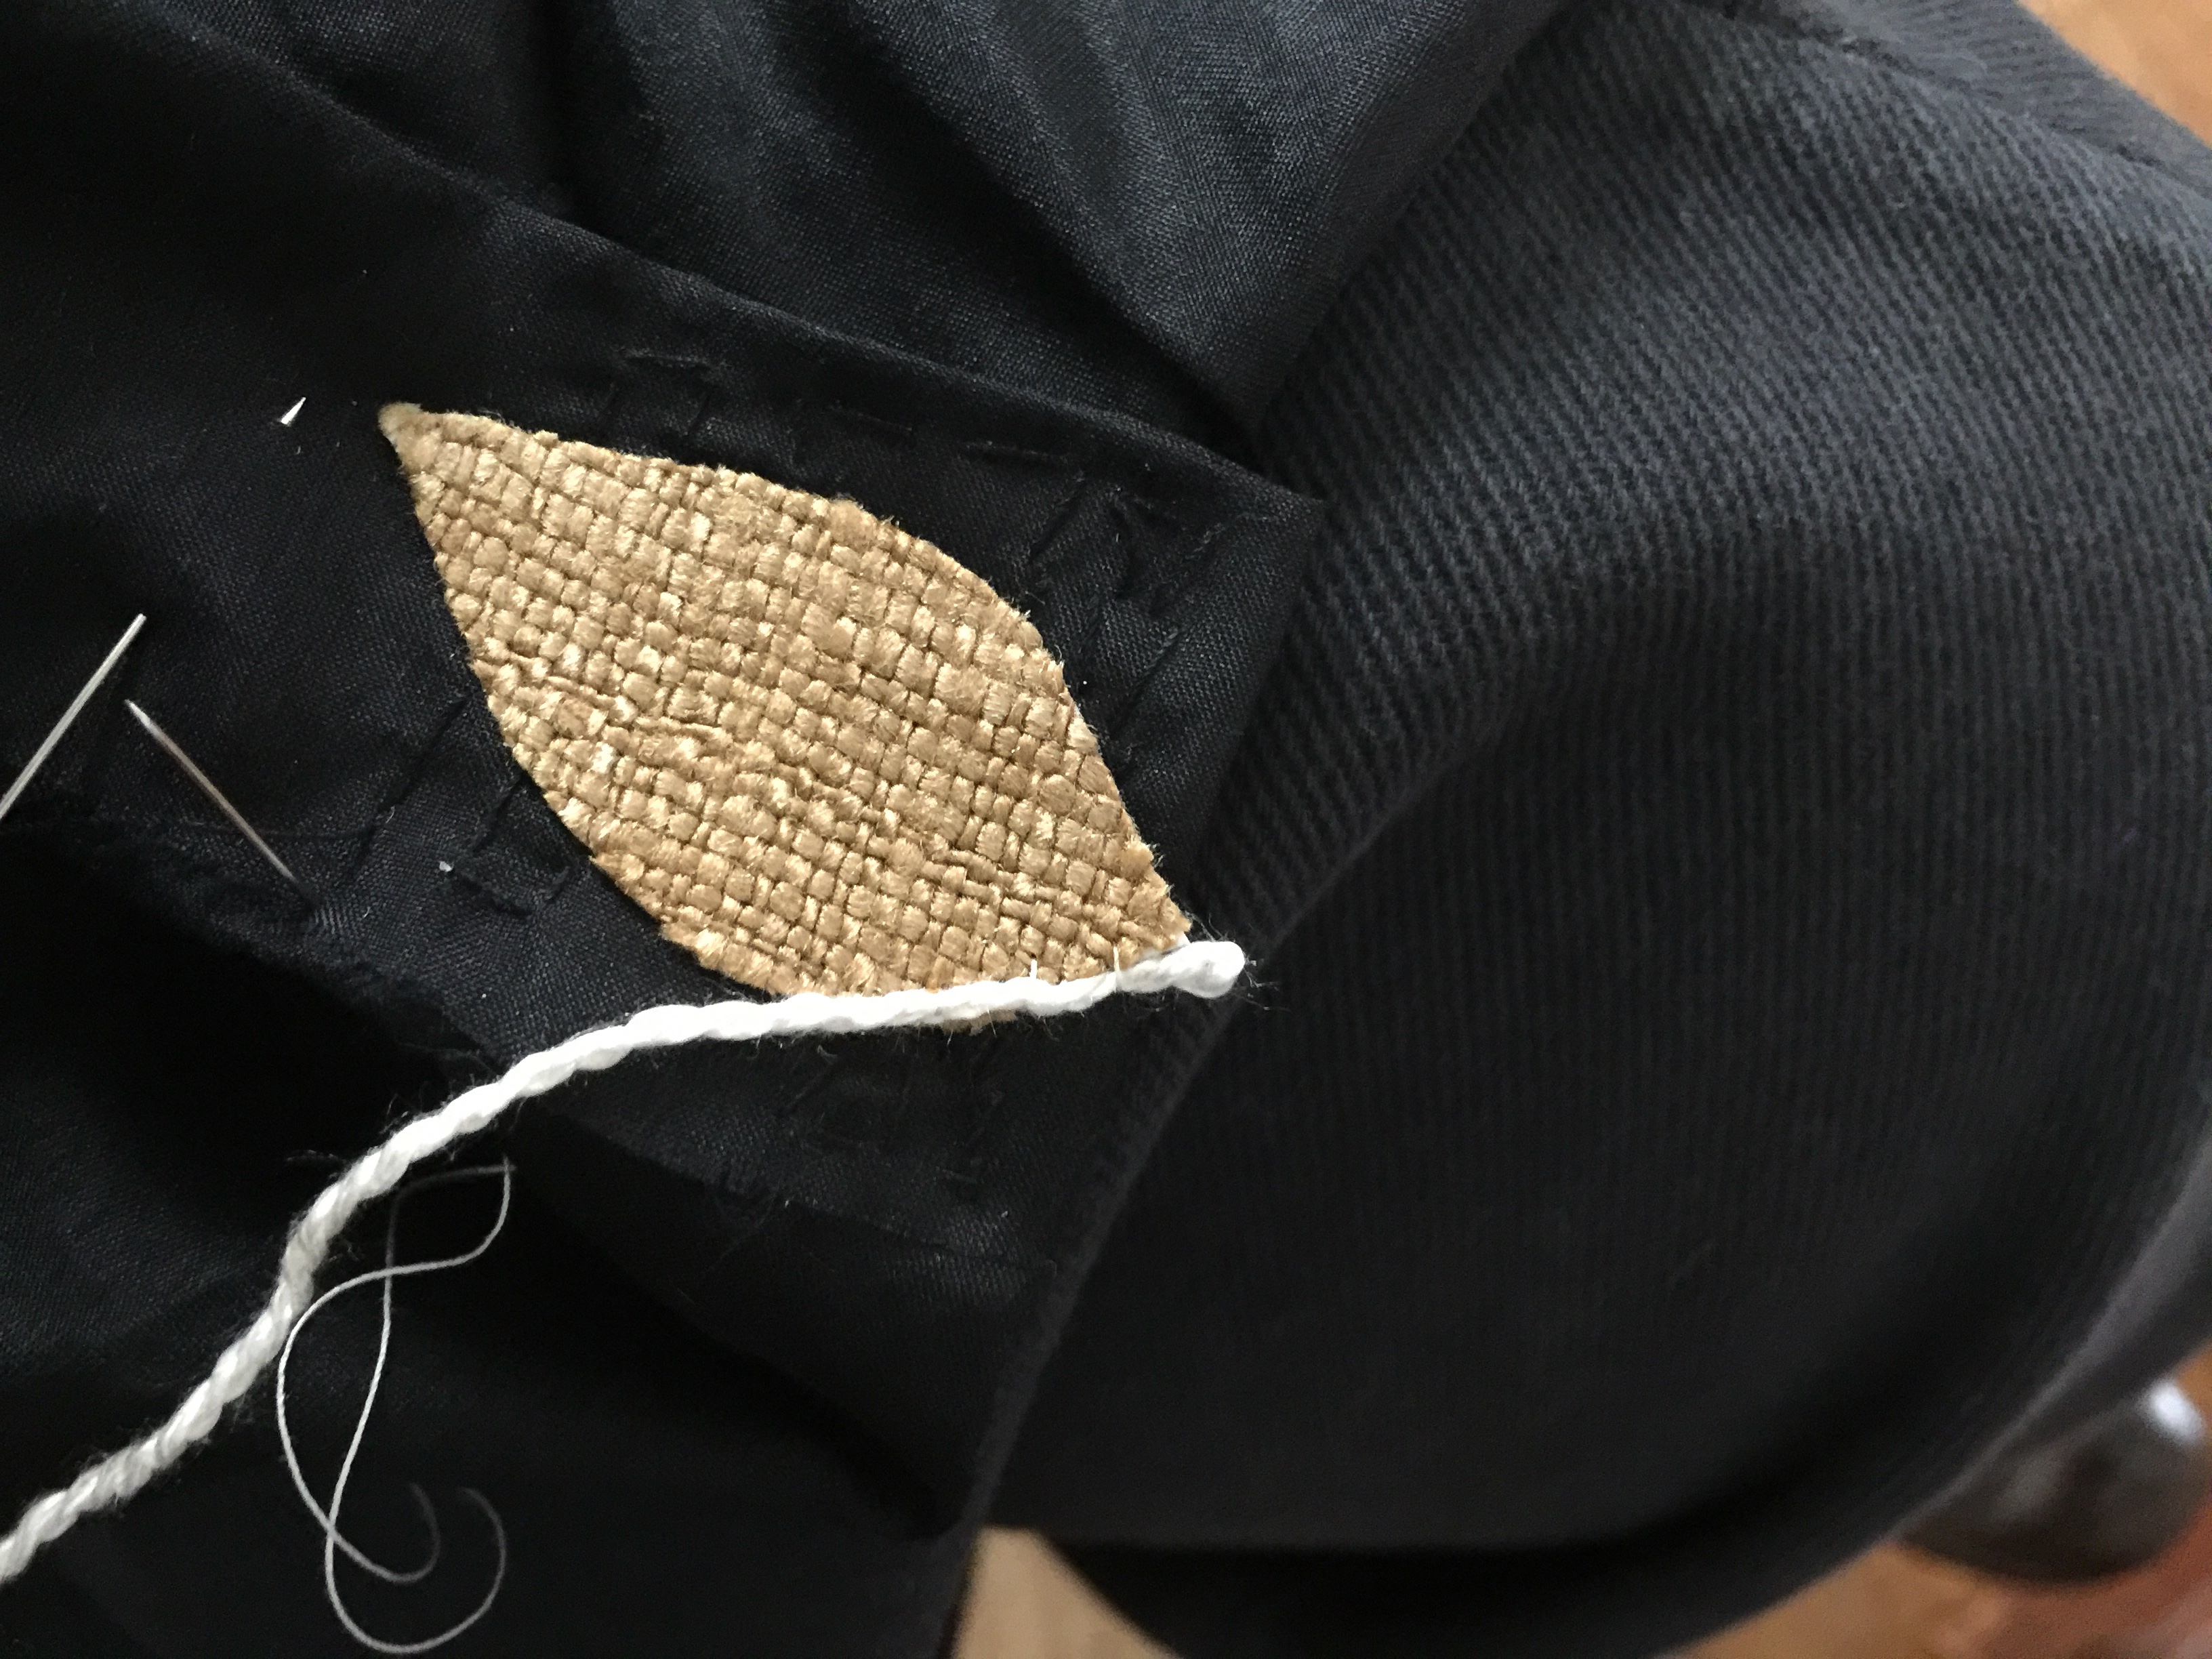
For the appliqué, I used a technique found in 16th century Europe. According to Janet Arnold’s Patterns of Fashion (pg 111), an extant loose gown has appliqué done by first mounting fabric onto glue. Meg Vaughan noticed this and pointed out that hide glue can be reactivated with heat and steam. I decided to follow her lead, using rag paper and hide glue.

Since extant 陣羽織 already show European influence on textiles in the use of piecing, this seems like a reasonable conjecture.

First, I experimented on a small leaf shape, to ensure I would be able to sew through the fabric, glue, and paper. It’s tough. It takes a good, strong needle, and a thimble wouldn’t go amiss. It’s definitely doable though. Thinner paper may have helped.

Appliqué test

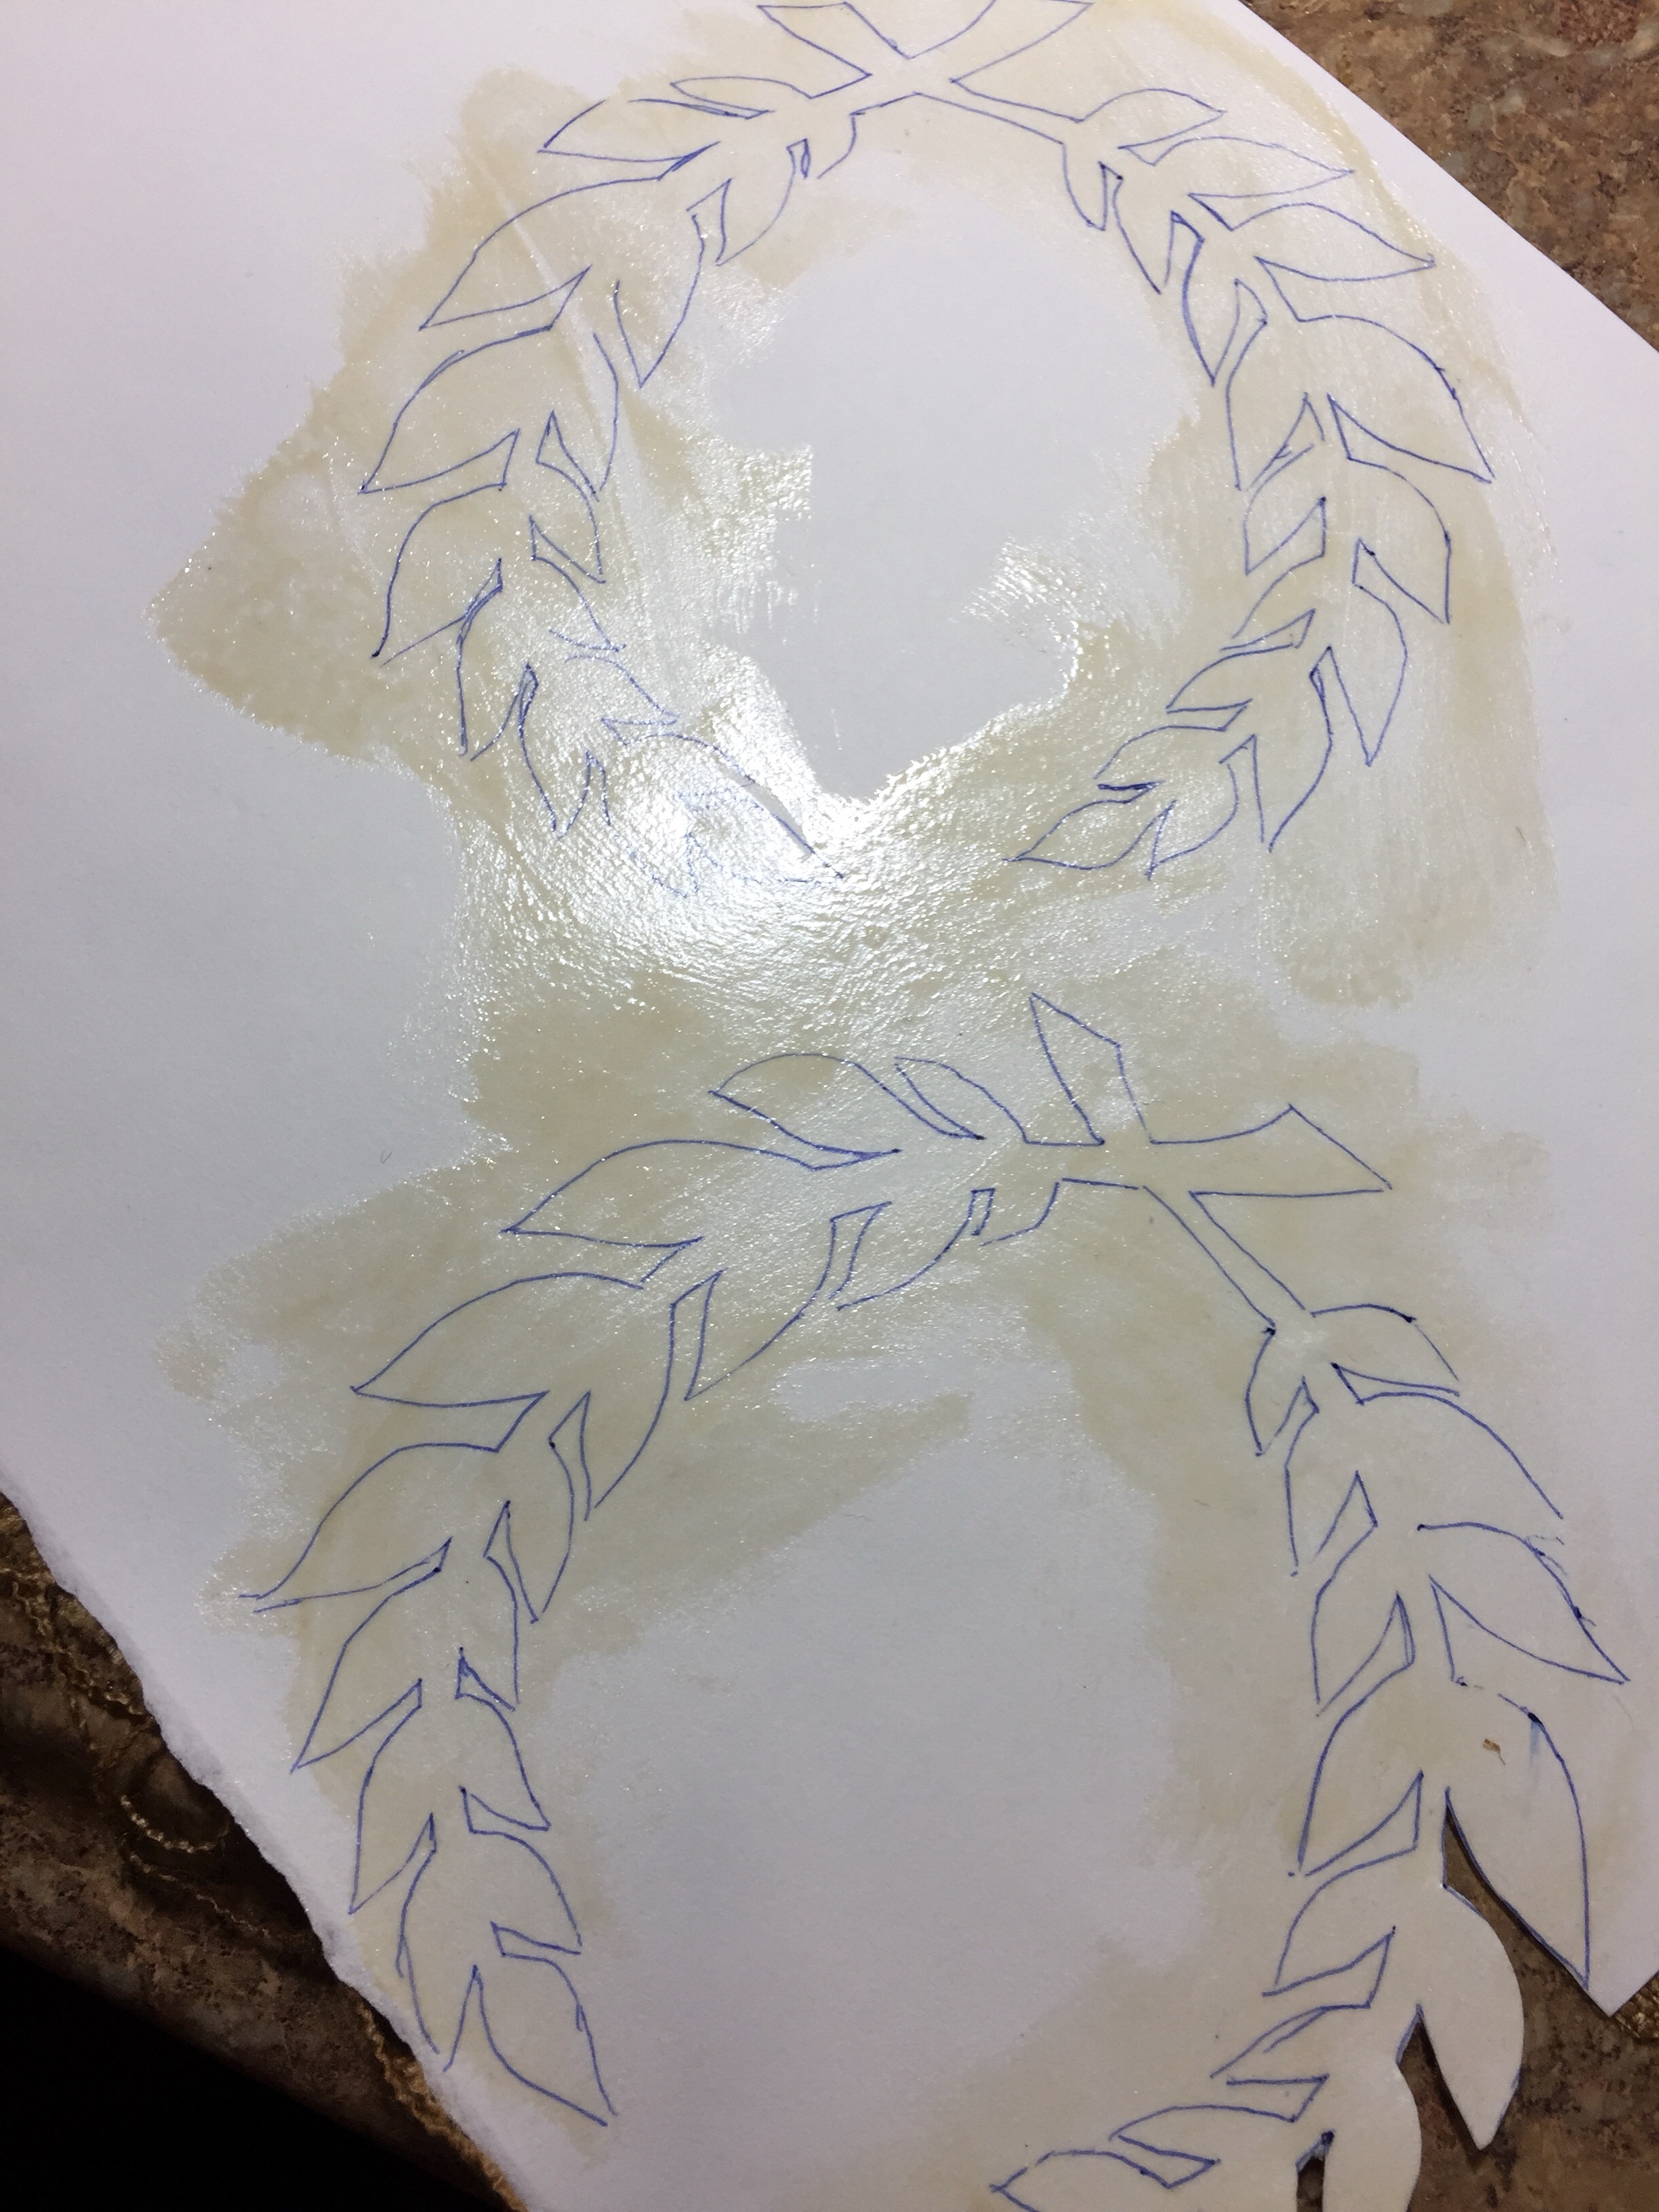
My experiment with using mulberry paper was an abysmal failure. I put way too much glue on for the thickness of paper, and my basement craft room’s humidity level was “standing water,” so I should’ve expected trouble. It didn’t even dry to tacky. It was stringy like taffy. It was bad.

I went back to the rag paper

First, I traced laurel leaves onto the paper. I glued the fabric to the back of that. After everything was dry, I painted glue on the drawing side, and let it dry too. Finally, I cut out the dry now-gummed laurel wreathes and ironed them in place.

Paper + hide glue = medieval Wonder Under

I am not good at timing. This mistake with the glue was overnight, the night before the laureling. I recruited several helpers at the event to get the 陣羽織 ready to wear.

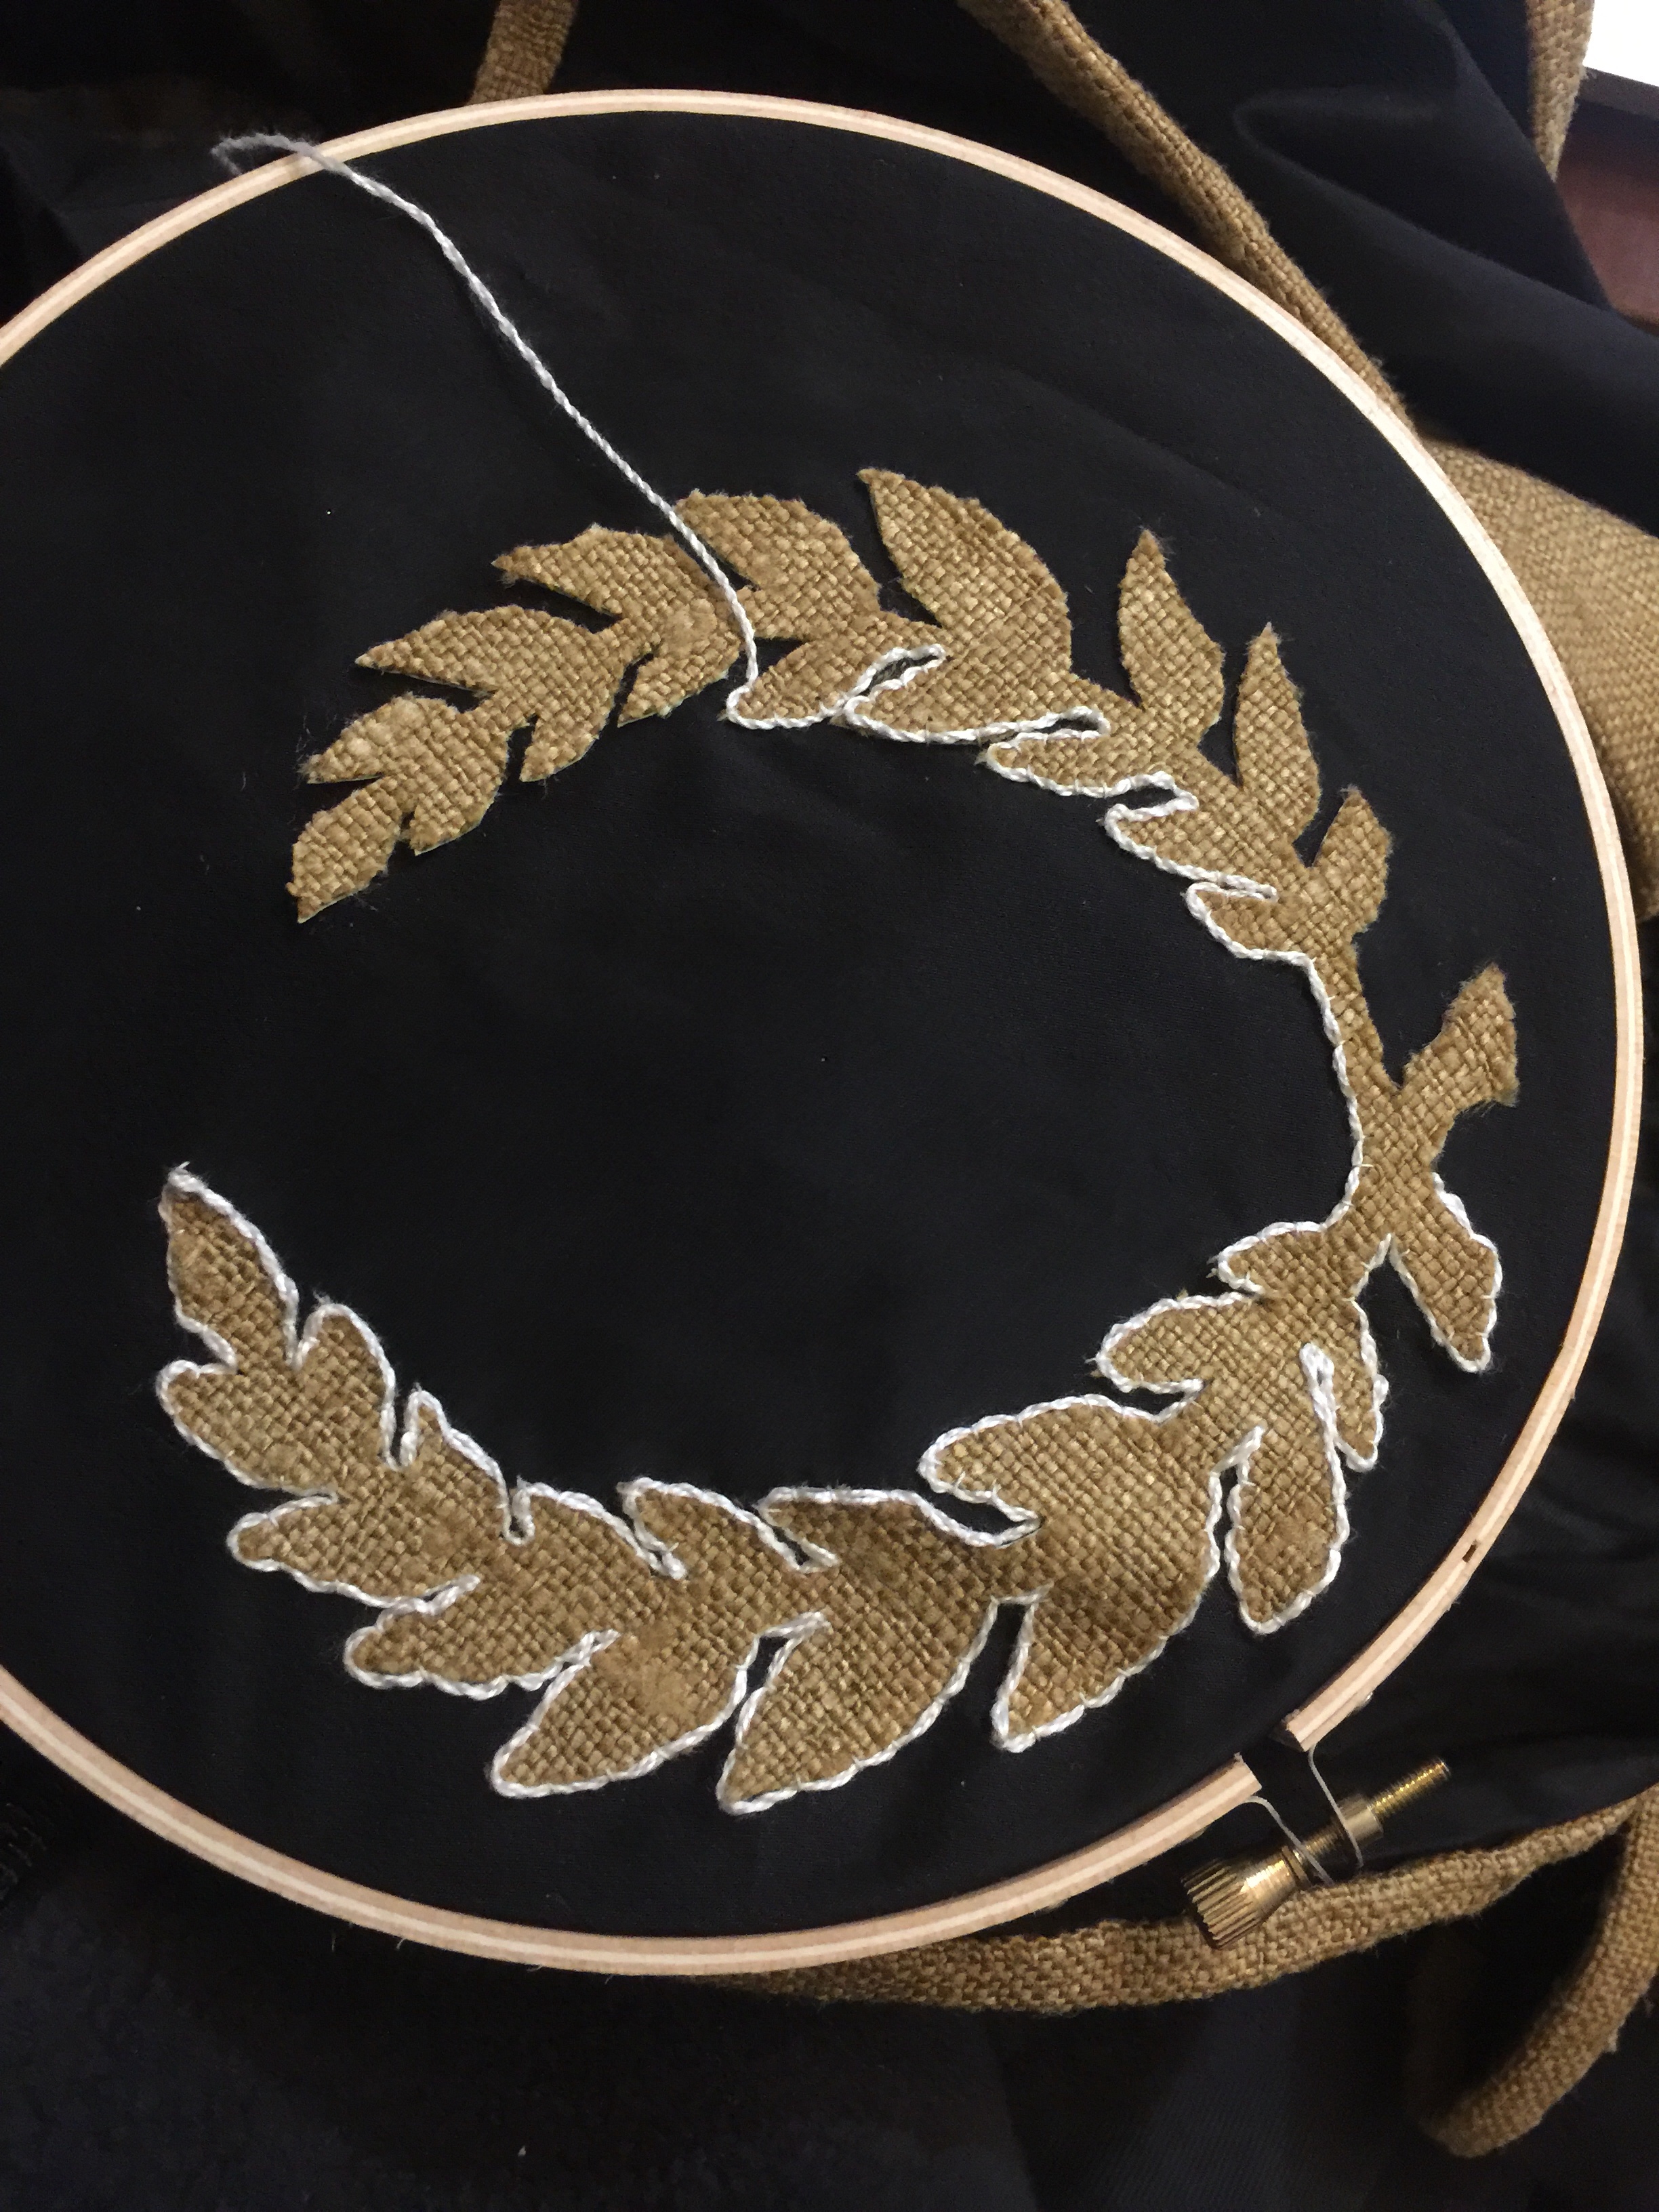
The day of the laureling, we worked without embroidery hoops because I’ve never done appliqué before and didn’t know better. The humidity caused the glue to begin to unstick, so the laurels were a little uneven. As of the laureling, the trim was all in place, but only half the outlining on the back laurel wreath was done.

After the laureling ceremony, I took the 陣羽織 home to complete and return at a later event. I adjusted the not-quite-even laurel wreath on the back and we used embroidery hoops for the rest. I’m still bad at timing, so at that later event, Lady Challys proved she is very skilled with a needle, as she and I worked simultaneously on different laurel wreathes.

Embroidery hoops make appliqué MUCH easier

五代先生 finally got to model it with all its bits in place. Ok, almost all. It seems not necessarily every extant one has a strap across the chest, but enough do that he wants one to be added.

The back
Happy new laurel

Thanks to my many helpers:

  • Baroness Janina Krakowska
  • Maestra Ragnveig Snorradottir
  • Lady Alicia Fansmith
  • 金森立つ目さま (Lady Tatsume)
  • Mistress Brienna Lindsay
  • Mistress Elien Rosamund
  • Lady Challys of Greenlion Bay

…and anyone else I forgot. If I forgot you, tell me.

What I learned

I learned I should always use an embroidery hoop when doing appliqué. This was my first time doing it.

I learned I should prepare my iron-ons several days in advance in case of glue screw-ups.

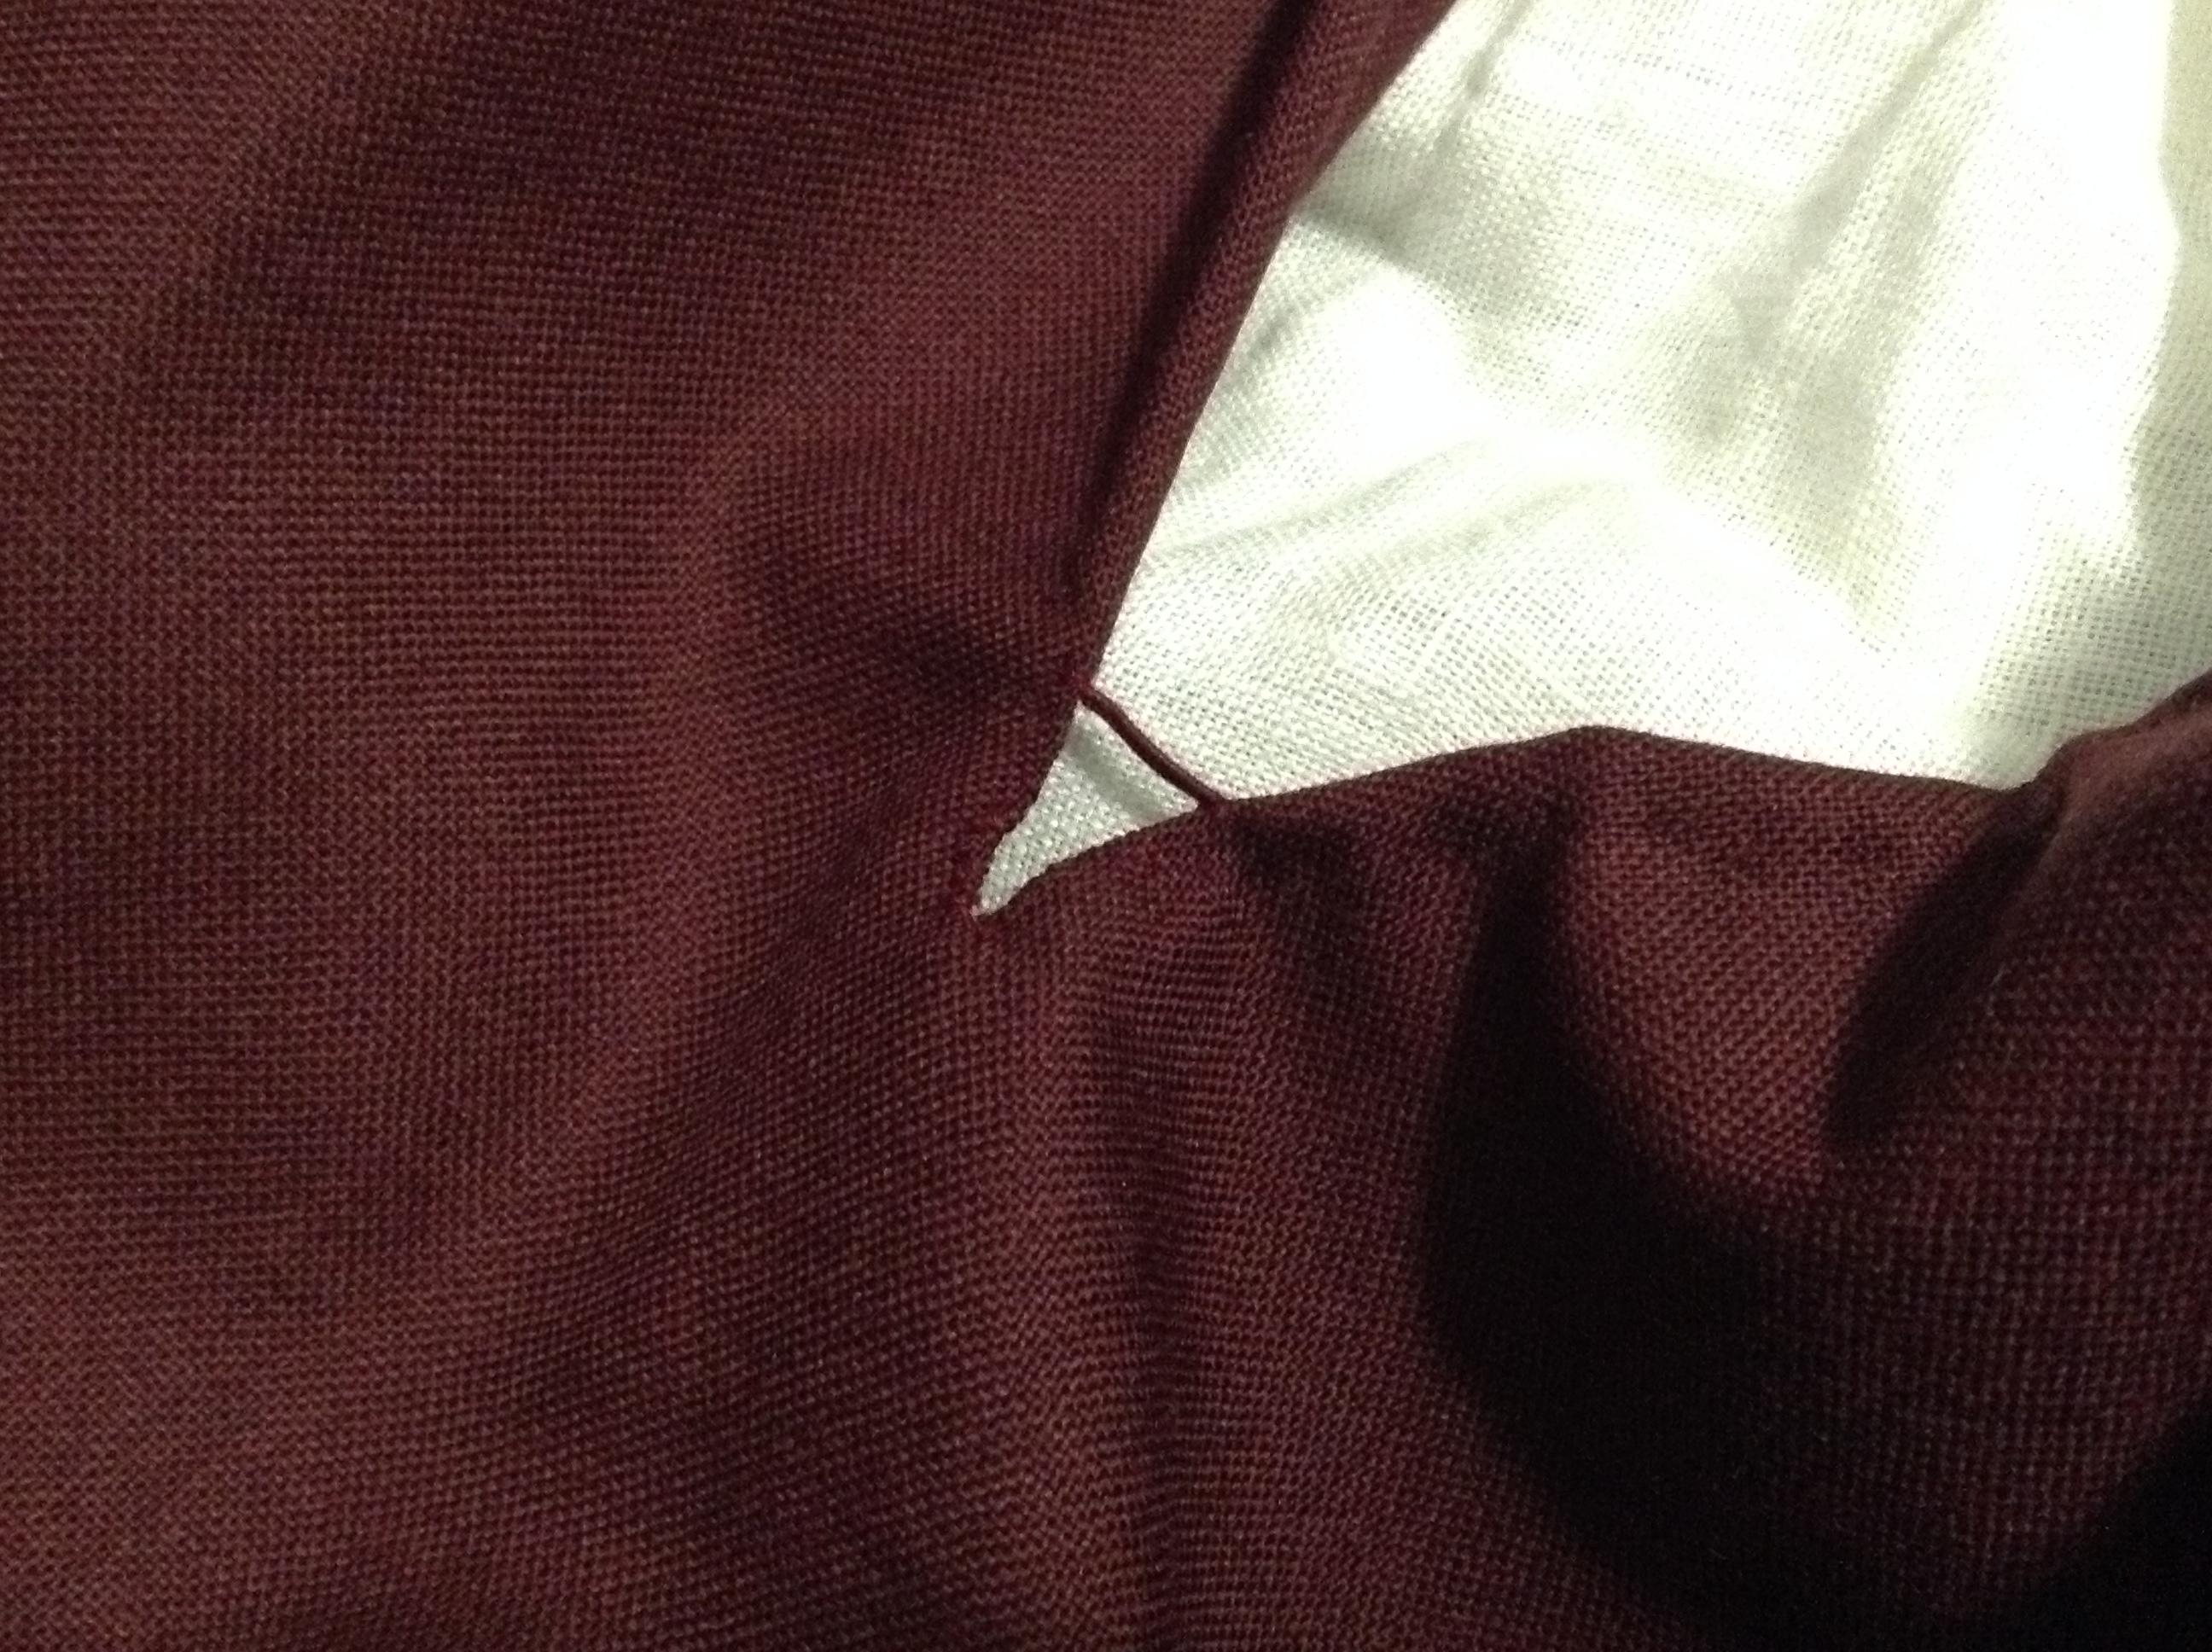
I learned taffeta frays horribly. I bought Fray-Check for the first time since age 14.

I learned Fray-Check will stay in fabric past when the dye starts coming out. Thankfully, that little drop was behind a spot that was covered by the appliqué.

Some time after the laureling and before the second event, I realized the trim should go all the way along the back, not stop at the collar. I corrected that. Some time after giving it to 五代先生 for good, I realized I was supposed to attach the collar with the seam allowance to the outside so that it would be covered by the trim that goes from shoulder point to shoulder point. Instead, I hid it inside the collar lining. You probably can’t see that, but my brain still knows it’s wrong,

Posted in Costuming | Tagged | Comments Off on Godai’s Jinbaori

Wool gown finished

Friday evening, while at NASFiC, I finished the wool gown. I wore it all day Saturday.

Now, the end result is not exactly what I wanted. The sleeves are narrower than they really ought to be, because I was a smidge short on fabric. I had to piece them. But, they fit.


A white woman with brown hair done up standing in a tight-fitting dark red dress with box pleated skirt and long sleeves
Me, posing in the completed dress
view of the inside of the waist, where single and triple box pleats are whip stitched to the bodice. Burgundy wool with dark red silk stitches.
Up to 8 layers of fabric are whip stitched together in each pleat

Backing up a bit, on Wednesday I stayed up til 2AM pleating the skirt on. The fabric turned out to be 63″ wide, so after seams to connect the two 45″ panels (cut edges at waist and floor), there was 124″ to pleat down to 26.5″ of waist. I put normal box pleats in the front and triple box pleats in the back. I had already hemmed one cut edge of each panel, so I pinned the hem to the bottom of the (hemmed) bodice, then whip stitched it all together with the same matching silk thread I used to hem the bodice. Doing things a little out of order, I sewed one thread-cut-worth of each skirt seam as I got to where I needed to incorporate that seam into one of the pleats and used scissors to cut the starts of the side slits while I was still pleating.

burgundy fabric with three hand sewn eyelets visible and a white fingerloop braid through one of them
Hand sewn eyelets

Thursday, I got up early and got the house ready to be left for a few days (cleaning the kitchen, mostly), got snacks for the trip, etc. then cut the pieces that became cuffs on the sleeves. On the first flight, I finished seaming the sleeves, but during the layover and on the second flight I was eyeleting. I have a bone awl, which gets through airport security easily.

burgundy fabric on a white background revealing two hemmed edges reinforced with a buttonhole bar of dark red silk
Buttonhole bar, worked in tiny silk stitches

Friday morning, I took my eyelet tools to the sessions I was attending and kept working. Then I cut the side slits to the same length as on my other gowns (good for pocket access), hemmed them, and did a buttonhole bar. Finally, I could work on the hem! I popped out of a session into the hallway to throw the gown over my head and make sure the hem didn’t need to be taken up, then went back inside to sew it.

And on Saturday, I wore it all over the con and got many compliments. I was asked if I was entering the masquerade, but I knew they weren’t using a rubric to judge, so I did not. I don’t think a lack of rubric is fair to either entrants or judges, which is why I got involved in updating Atlantia’s judging criteria. I’ve tried judging an A&S entry without a rubric. It’s exceedingly unpleasant and results in all the judges working from mismatched scales.

Posted in Costuming | Tagged , , , , , , | Comments Off on Wool gown finished

Wool gown progress

Bodice front and back interlinings done in cream-colored linen with pad stitching. Front bodice piece is folded to show white linen lining. Background is burgundy wool.
The bodice pieces ready to be wrapped in wool

The wool gown is coming along pretty well. On Thursday, I finished pad stitching the bodice interlining.

image shows inside of back bodice piece and outside of front bodice piece. Lining is white linen. Fashion fabric is burgundy wool.
The bodice is done, save for some eyelets and the shoulder seams

Over the weekend, I attached the lining, and then attached the fashion fabric.

Now I’m hemming one edge of each skirt panel (they’re straight rectangles, cut so selvages will be on the vertical seams) to be where the waist is, then I’ll pleat it and sew that finished, pleated edge to the bottom edge of the bodice.

Well, I’ll probably sew the shoulder straps together at the top and the selvages of the skirt pieces together at the sides, THEN do the pleating.

Did I mention I’m hoping to wear this dress on Saturday at the North American Science Fiction Convention? I’m going to be on a costuming panel there that day. I’m 99% sure I won’t have the doppia in at that point, but I’m hopeful about sleeves—which, by the way, look like they should be pinned on.

Posted in Costuming | Tagged , , , , , , | Comments Off on Wool gown progress

Blog maintenance: documentation is visible again

(Swaps from sottana to t-shirt and puts on computer-nerd hat)

After receiving a request via blog comment asking for my documentation for one of my projects, I went “hmmm” and looked around. Turns out my documentation had disappeared! The Javascript console informed me that http://www.scribd.com/javascripts/view.js did not exist, so the plugin for displaying documents was breaking. The plugin’s not maintained anymore, but I checked out Scribd’s API documentation and saw that it ought to be http://www.scribd.com/javascripts/scribd_api.js these days, so (hoping it would Just Work™) I modified the installed plugin to use that URL, and yay! The documentation is showing up again!

Posted in Uncategorized | Comments Off on Blog maintenance: documentation is visible again

The “Elizabethan Seam” and outer garments

Twice in the last week, I’ve seen a link to Mistress Isobel’s “The Elizabethan Seam” with the question “well, yes, we’ve all seen this in smocks and shirts, but is there any extant example that isn’t a smock or a shirt?” If you don’t feel like clicking the link, the gist of it is that a very strong hand sewn seam can be made by hemming your pattern pieces then whip stitching them together.

Everyone pull out your copy of Janet Arnold’s “Patterns of Fashion 3”. The following images show seams that I’m certain are whip-stitched together:

  • Page 18, image 105. Nils Sture’s pluderhose are whip stitched together. The pieces are finished with a bound hem.  (1567)
  • Page 24, image 156. There are black whip stitches on white fabric. (1590-1600)
  • Page 25, image 167 (1610)
  • Page 52, image 370. The pieces of that shoulder wing are whip stitched together. (1610-1620)

Yes, you can tell the difference between whip stitch and running stitch with a close enough photo. For a contrasting example, see image 197 on page 29. If you look very, very closely (possibly with a magnifying glass if you’re less myopic than I am), you can see that stitches alternate direction /  \  /  \   This is the sign of a running stitch. In contrast, the seams listed above have parallel lines running across the seam: |  |  |  |

Only one of these examples lets us see how the edges were finished before the whip stitch was done. I would love to see inside photos of the others, but alas that bit of information remains a mystery. Well, a mystery except that we do have other examples in shirts and smocks, and now that we know the “hem then seam” technique does occur beyond the realm of linens, I think it is safe to expect the types of hemming used to match as well.

There aren’t many extant garments from the early 16th century, and “Patterns of Fashion 3” starts in 1560, so I can’t show you earlier examples, but I hope this does answer that question for the next time it comes up.

Posted in Costuming | Tagged , , , , , | Comments Off on The “Elizabethan Seam” and outer garments

Italian Renaissance Costuming Challenge and pattern mucking

The 4th annual Italian Renaissance Costuming Challenge, by Realm of Venus, has begun. On the spur of the moment, I decided to enter. The challenge is to make a 4-layer Italian Renaissance outfit in 4 months, starting June 1, ending September 30.

On the one hand, those who know what’s going on with my personal life may think I’m a little …overly ambitious. That end date of September 30? That’s less than 3 weeks before my wedding. I’m sewing my own wedding dress. No, I haven’t started yet. (My mom keeps asking. Seriously, lady, I’m going to be using a sewing machine! It’ll take a Saturday!)

On the other hand, I picked up this lovely burgundy worsted wool at Fort Frederick Market Fair last month, and I had already gotten it into my head to handsew a new dress using heavy linen interlining in time to wear it at the North America Science Fiction Convention (my first sci-fi con) in mid-July. And I wanted to make a new camicia and a partlet and maybe some drawers in time for Pennsic. So, really, I was already planning most of this work anyway, right?

Having disliked the shoulders on every previous dress I’ve made, I decided to try the Tudor Tailor’s kirtle pattern. Nope. In the midst of getting my future sister-in-law to try to fit me in that, I had a flash back to being 19 and trying to buy a suit. I had to go up two sizes after finding one that fit my body in order to fit my shoulders. Oh, right.

There was some more muddling with the Tudor Tailor’s pattern. One person suggested putting the interlining on the bias so that the shoulder straps end up straight of grain, and then it’ll cup the bosom, but I 1) have no evidence of this and 2) end up with that “cup runneth over” look that happens when your cup size on a bra is too small.

So I just put on one of my oldest dresses, based on Jen Thomspon’s pattern, and stared very hard in the mirror. Then I stared at some 1520s Bacchiacca and 1500s Raphael paintings. Then I looked back in the mirror. I stared at Anéa’s photos of the linsey-woolsey dress at Pisa and the red dress at Pisa and how their shoulder straps are shaped.

Things I’ve determined:

  1. Those “shoulder straps” are not on the shoulders.  They’re very slightly on the shoulder, just enough for the inner edge of the “shoulder strap” to hang onto the shoulder point. The outside edge is solidly on the arm. See also: Lady with a Unicorn, La Muta, and the women in orange, red, and green on The Preaching of Saint John the Baptist.
  2. Raising the neckline will better match the amount of décolletage shown, AND it helps with that illusion of the neckline disappearing into the armpit. The lower the neckline goes, the narrower it gets, because that’s how a trapezoid works. My necklines are currently just below armpit level (referring to the crease of the armpit with arms down at sides, not the depths of the armscye), but they should be just above it. Two inches should do it.
  3. To correct my blue and grey dresses,I can redo the shoulder seam so it’s on an angle instead of being cut at right angles to the shoulder straps. You can see this in the way they’re cut on the linsey-woolsey dress. Note also that the seam is behind the shoulder.

Ok, so range of motion isn’t ideal with a somewhat off-the-shoulder style (which might be why so many people go for center-clavicle straight up-and-down straps). I can’t touch my elbows to each other in this dress. My dad can’t touch his elbows to each other, period. If I wasn’t made of rubber bands (I’m hypermobile, think of a circus contortionist), this would only be a slight decrease in range of motion. Even if we think about lower class activities, I’m 100% confident I could cook and garden with this restricted range of motion, even if raising my arms only goes into the Y of YMCA instead of touching my biceps to my ears.

The shoulder seam is pinned to correct how it sits

Having pinned the shoulder seam on the grey dress that I’m sitting here wearing so that it’s got the angled seam going on, yep, that’s enough to make the shoulders stay put instead of sliding down.

Oh, and I’m tagging this post with “Persona Pentathlon” because if I’m making a complete outfit by September 30, I should be in good shape for next year’s Pentathlon in March.

Posted in Costuming | Tagged , , , , , | Comments Off on Italian Renaissance Costuming Challenge and pattern mucking

Weaving & Apprenticeship

I’m now apprenticed to Mistress Brienna, the fabric production Laurel from Bright Hills. So, if I get in trouble, I guess you’re supposed to tell her! I found out about a woman in Delaware selling a 42″ wide counterbalance loom, so Brienna and I went over to snatch it up. It’s now in my basement in what was the scribal room and is now the loom room (though it does still have scribal supplies in it).

42" counterbalance floor loom on the right and a table loom on the left
42″ counterbalance floor loom on the right and a table loom on the left

The table loom is still in there, still disassembled. I got a new set of heddles for it, though, so I should get the old ones off and shine up their holders and put the new ones on.

I also picked up a tablet loom from Egill’s Woodstuffs over the winter. During last month’s Textile Arts Guild meetup at Brienna’s house, we got it warped up in continuous warp fashion and I started playing around. I made a new belt, this one long enough to go around my waist three times so I can hold a distaff easily.

Zig-zaggy purple and blue belt

On that note, if you’d like a tablet loom like the one I have, I suggest making that order soon. Egill was robbed last week, and he could really use the business to get things back together.

Posted in Uncategorized | Comments Off on Weaving & Apprenticeship

Silk Sources

I was supply-hunting and found a few useful things which Mistress Rosalind thought I should probably put here so I can find it again later and others might too.

Accordingly, for silk fabric that is already dyed (as opposed to getting it from Dharma Trading and dyeing it yourself): Fabric Mart – 45″ charmeuse is $20/yd. Their stock rotates, so what they have now and what they have in a year won’t be the same.

And for silk buttonhole twist, I learned that Gütermann, everyone’s favorite thread, had buttonhole twist available. It’s product number R753. All of their silk colors are available in 400m lengths, and a subset are available in 30m lengths. They have a downloadable color card, but I also found a physical sample card for sale for $20. Bay Tailor Supply sells 400m spools of R753 for $14.

Why do I care about buttonhole twist?

I sew a lot of eyelets. No, really, a lot. I wear Italian Ren ordinarily, which means at least two, possibly three, rows of eyelets per dress. I’ve also been bribed to do the hand-finishing on 4 or 5 fitted cotehardies, which means one long row of eyelets per dress. At the end of the current dress, I will have done over 200 eyelets in only 3 years in the SCA.

On two of my dresses, I used, I think it was 3 strands out of the 6 strands of DMC embrodery floss. On one, I used linen thread of a decently heavy weight. With the heavier linen thread, and having had lots of practice, I could do an eyelet in 5-10 minutes. Great!

On the dresses for a friend, though, I was using regular old sewing thread. It’s very thin, so to get better coverage I doubled it. That introduces the fun of ensuring even tension on both strands while working, which isn’t the hardest thing ever, but it does slow me down. It still didn’t cover well, so I still needed to do more stitching than when I had that linen thread that was so well-suited to the task.

So, I want to use buttonhole twist, the right tool for the job, in the future. It’s not sold in stores, as far as I can tell, so having a sample card to color match (or coordinate) fabric will save a huge headache.

Posted in Costuming | Tagged , | Comments Off on Silk Sources

My whorl on another reproduction spindle

German archaeologist Katrin Kania sells reproduction spindles. I ordered one from her and was happy to see my whorl fit perfectly.  This will be my new in-the-hand spindle for flax.

Hand holding a hardwood stick tapered at both ends with slate stone whorl on the shorter end
My whorl with a hook-less tapered spindle shaft inserted. This will be good for in-the-hand spinning of flax.


I did my Icelandic spinning project using a different spindle shaft. That one is a reproduction Anglo-Saxon spindle shaft by Mistress Rhiannon of Æthelmearc.


a wooden stick, bulbous in the middle, with hooks on each end, and a stone whorl inserted
My spindle whorl on Mistress Rhiannon’s shaft
Tagged , | Comments Off on My whorl on another reproduction spindle

Kingdom A&S Festival

Yesterday was great! I finished the serk (underdress) at 3AM then got up at 7:30AM to take a photo with it on and add that to the documentation.

I headed up to the event. Twenty minutes from arriving a friend contacted me going “hey my Saturday opened up, is it too late to come this SCA thing?” I told her I can’t drive her up, but if she can get someone to give her a lift, there’s garb in my closet that’ll fit her. That didn’t happen.

While setting up, I realized my serk documentation was missing. It’s stored in Dropbox, so I tried tethering my iPad to my phone to download it. I didn’t have a data signal. Just as I was about to leave to use McDonalds’ WiFi, Lady Babs offered her phone’s tethering since she’s on a different network. It downloaded in a few minutes, and I was all set to go with zoomable documentation.

I got a ton of compliments on my documentation. It was almost all 10/10. Thank you to Sir Stanford, Mistress Elienne, and Baron Badouin for reviewing all of it beforehand! Yes, I’ll be posting it here soon. I’m working on getting the last of the photos up first.

My dresses scored in the 90s (out of 100), and Master Miguel (the Spanish Peacock) gave complimentary remarks on my spindle whorl when he judged it.

I don’t know where I ended up in the rankings, but it was high enough that when I told the person running the pentathlon that one of my score sheets was added up wrong, with 6*3=6, shorting me by 12 points, she jumped out of her seat, ran to talk to the other person who was running it, then ran to her car to recheck the final scores. She said the top 3 were so close this could shake things up. This was before the winner was announced, so I know it didn’t shake them up that much.

Overall, on 11 judging sheets I had 984 points, or an average of 89.5. The smokkr scored 93 and 95. The serk scored 89, 93, and 94. The dyed wool scored 75 and 98. The yarn scored 54 and 94. The whorl scored 78 and 85.

Tagged , | Comments Off on Kingdom A&S Festival